![]()
03 lp-in1

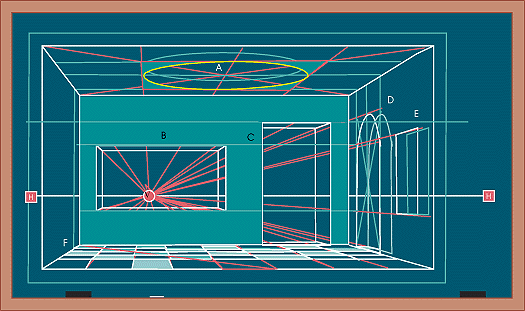
The vanishing points and horizon line are often obscured when observing interior spaces. It is important to remember that one's eye level is the horizon line. In an interior space, it would be an imaginary horizontal plane at eye level that cuts through everything. You could make a mark on the wall, while standing next to it, at eye level and this would carry throughout the room and on into infinity. The following are short explanations of the above diagram:
A. There is a large circular window in the ceiling of this interior. One can plot the center and placement of such an element by first finding the middle. This can be done by running a large x through the space from corner to corner. The point where the lines intersect will be the middle (remember that spaces get smaller as they recede, so the back of the space will be smaller than the front in perspective). If you know the approximate dimensions of the circle you can find the extreme edges of the circle by placing two horizontals and two verticals in the space (they will intersect on the x lines, that's where they will change directions). You can then find the extreme points of your circle on the centers of the flat sides. By connecting these four points with a parabolic curve, you can create a convincing centered circle on any plane that is receding.
B. The large window in the rear wall opens on the vanishing point and horizon line. If you look carefully at the corners of the window you will notice that inside of the window there are planes that recede to the vanishing point. The corners have angles that lead to the vanishing point because these are planes that are receding away from the viewer.
C. There is also a doorway in the back wall which has similar properties to the window. You can see more of the underside at the top of the doorway because it is higher or further from the horizon line. As planes get further away from the vanishing point and horizon line you can see more of them.
D. The arched doorway on the right side wall is just as tall as the doorway in the back wall. You will notice that a light green line is drawn to indicate the height of the doorway in the back wall. If you follow this line until it intersects with the right side wall you will notice that one of the red convergence lines also meets here, then continues on along the right wall. Because objects on the right wall are getting larger as they come closer to the viewer, the line on the back wall is the same height as the red line on the side wall. The arch way is done just like the ceiling circle, but halved and placed on top of two verticals.
E. The window in the right side wall is the same height as the window in the back wall. There are also light green construction lines that indicate height and meet the red convergence lines.
F. Tiled floors are a good example of how things get larger as they move further away from the vanishing point and horizon line. The best way to make a convincing tile floor is start by approximating or plotting the dimensions of just one square tile at any corner of the floor. Delineate the entire back wall by using equal distances along a horizontal path. Through each of the delineations run a convergence line from the vanishing point through the point and well beyond. This will give you a series of lines on the floor running back to the vanishing point. Using the first tile that you drew, run a diagonal from corner to corner within that tile and extend that line out beyond the edge (like the red line on the diagram). At each point that the red line intersects with the convergence lines you will draw a horizontal line that intersects at the same point. This will give you a tile floor if you continue this process.
A good example of perspective used in an interior space occurs in Raphael's School of Athens. In this example, one can see that the convergence lines that create the architecture converge at the two central standing figures in the background.
| Back to 2 |